Apple announced iOS 17 At its international conference for developers and with the next major software update comes a lot of new information. We have it several favoritessuch as NameDrop and Check In formbut we’re also big fans of the new Contact Notes and their ability to make your iPhone app even more fun when someone calls.
It’s a public beta here, Anyone with a compatible iPhone can install iOS 17 and started using new features, including Contact Posters. If you have iOS 17 downloaded, or are considering downloading it, here’s everything you need to know about Contact Posters including what it is, how to turn it on, and how to create a personalized photo on iPhone and get a Contact Poster looking sharp! We’ve also added tips and tricks below.
What are the Contact Notes in iOS 17?
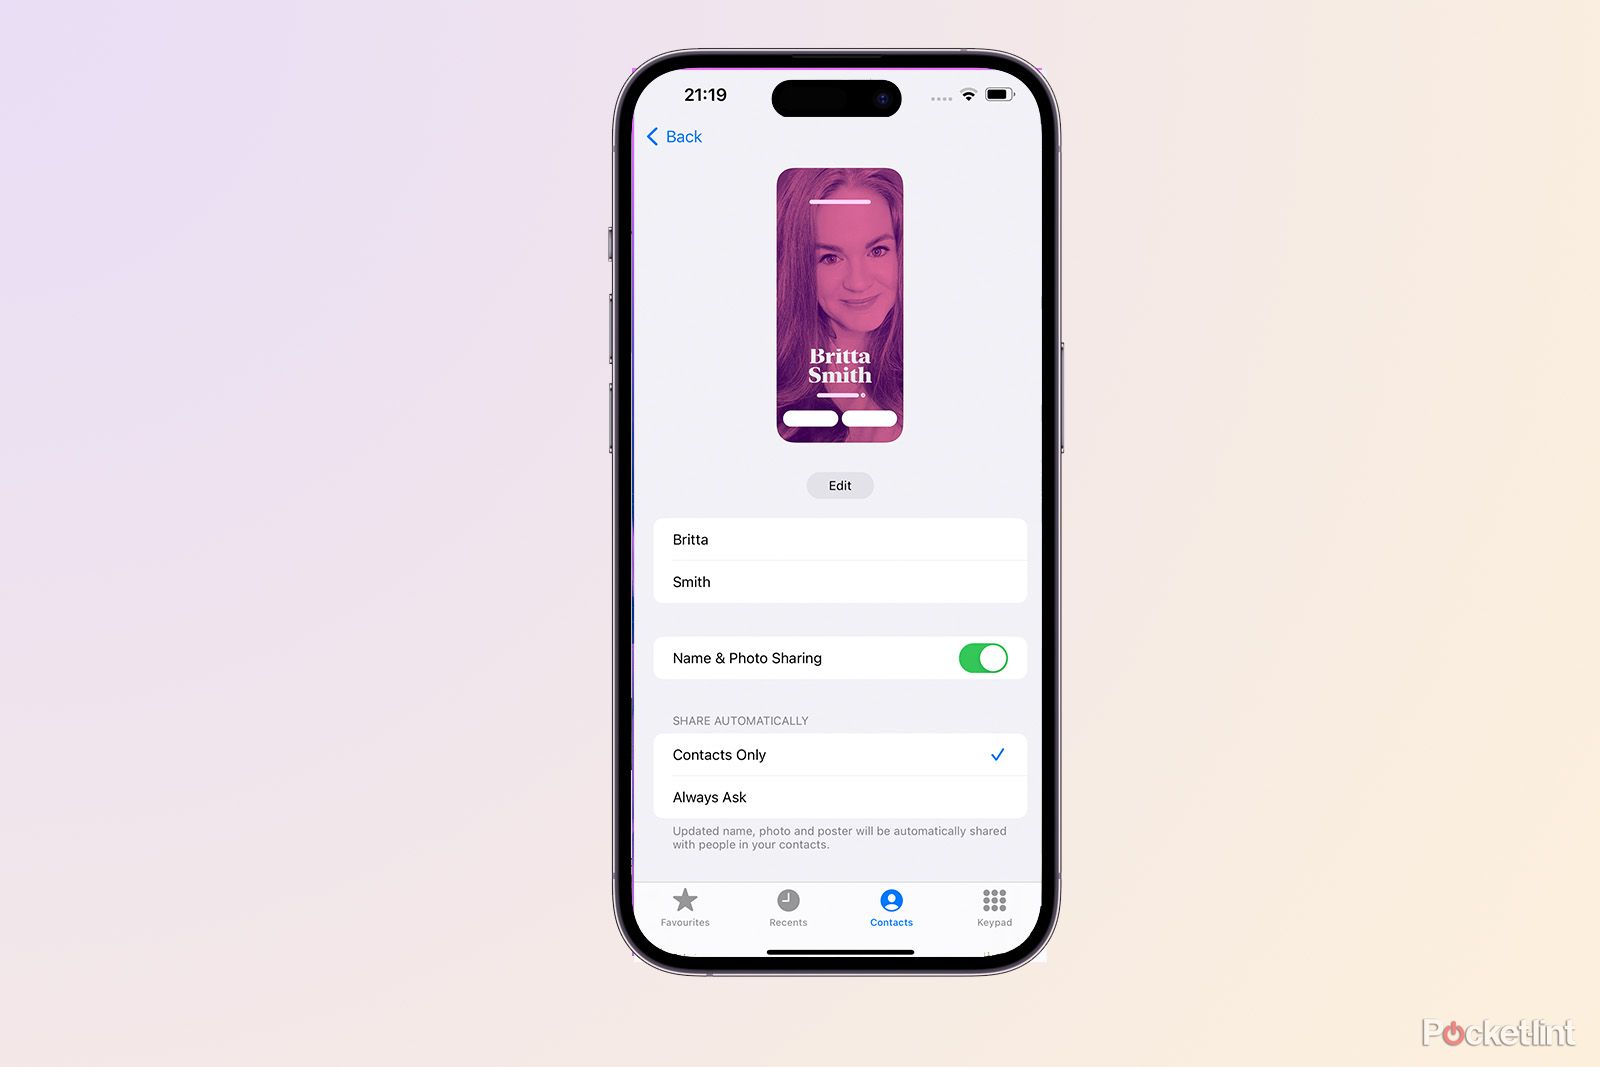
Linked Notes is a new method iPhone it will show your information when you call someone, as long as you have it turned on, the person has information saved on their phone and you choose to share it with your contacts. You can also select ‘Always Ask’ to share your Contact Page with the people you want to share it with.
If you are not using the iOS 17 beta, if you call someone (iPhone to iPhone), your name along with a thumbnail will appear on their screen and vice versa. With Contact Banners, your information and personalized contact card will be displayed on the entire screen and not only the picture or Animoji of your choice, but your name in the font and text of your choice as well. This feature will also work if you use NameDrop, which is another feature of iOS 17 that allows you to share your information with another iPhone user by simply touching the top of your iPhone over their iPhone.

How to create a Touch Screen in iOS 17
To set up Contacts for the first time and create a personal profile picture that highlights everyone with the iOS 17 app, follow these steps:
- Open the Phone app on your iPhone
- Click on the Contacts tab at the bottom of the app
- Click on My Card at the top
- Click on Contact Photo and Poster
- Click Continue to start customizing the image
- Select your options and click ‘Done’ in the top right corner
- You will be able to view your contact post when you are done, if you are happy, click ‘Continue’
- You can choose to change the Contact Photo
From here, you get several options. You can type your name as you want it to appear, and then you can select your post. Do you want to take a picture there? No problem, click the Camera icon. Do you want to use that amazing selfie you already have? Click the Photos icon and navigate to your library. If you want to use a pre-configured Memoji, or create a new Memoji, click the Memoji icon. Alternatively, you can use a Monogram for your initials to make it easier. All options can be personalized, which we will discuss in detail below.

How to customize Contact Poster in iOS 17
There are several ways to customize your Contact Poster in iOS 17, starting from changing the size and color of the font, as well as the thickness of the font itself, adding a filter to your photos or playing with depth if you use a photo taken in Portrait Mode. Your Contact Poster will be displayed in real time as you edit, so you can see your changes instantly and decide how you feel.
Using a camera or photos
If you choose to use a photo from the camera or choose a photo from your library, you can click the circle in the upper right corner to turn the depth on or off. You can change the color, size and shape of your name by clicking on it. You can also pinch in and out with your fingers to scroll down or zoom in on your picture. At the bottom, there are four filters, which you can drag and drop on your screen, and you can change the color of some of the filters by clicking on the colored square next to them.
Using Memoji
You can choose a Memoji you have already created, a Animoji or you can create a new Memoji to use as a Contact Poster. Click on the “+” to create a new Memoji that you can use, or click on an existing one. If you select an existing Memoji, you can select the camera option within it and create a text for the Memoji to use as your Caption. Click on the blue circle once you have created the text you want to save, or select an existing text from the list below and click “Next” on the top right.
To change the background color, click on the colored square in the lower left corner and change the text, click there to change the shape, size and color.
Using a monogram
Monogram uses the first two letters of the name and surname you entered on the main Contact Poster page, although you can change this by selecting the initials in the bottom right. You can only have two characters but keep this in mind. As with the Memoji option, you can change the background color by tapping on the colored square in the bottom left corner. The same method works for text like others, where you click on the text you want to change and choose the size, color and format.

How to change your Contact Poster and switch between them
You don’t have to have just one Art. You can easily switch between them if you want one with Memoji, one with Monogram and one with your custom photo, you can. You can only have one at a time, but it’s easy to edit and customize so you can change your look every week if you want, or every day. To change your Contact Poster settings or switch between your saved Posts, follow these steps:
- Open the Phone app
- Click on Contacts
- Click on My Card
- Click on Contact Photo & Poster
- Click on Edit under your Contact Picture and Photo
- Scroll through your Contacts to select a different one
- Click on the Contact Poster you want
- If you want to change the existing Contact Sign, save it and click Customize at the bottom to change it.
 Top six tips for creating a Contact Poster in iOS 17
Choose who you want to share the Contact Poster with
You can choose who you want to share your Contact Poster with if you call someone who doesn’t have your contact number, you can choose whether you want your Contact Poster to be displayed or not. To do this, click Phone > Contacts tab > My Card > Link Photo & Poster > Change Name & Photo Sharing > Choose between Contacts Only and Always Ask.
Use static images
Think about how your Contact Poster looks. You want to use vertical images if possible with crops in order to fill the screen very well when you appear on someone else’s iPhone.
Use form
If you want to give your Contact Poster something extra, try taking a photo using Portrait Mode on your iPhone’s camera and playing around with the depth on and off.
Keep it simple
Your Support Page will be displayed for as long as possible during your call so you don’t have to go through. Keep it simple.

Try it
We played around with the Interactive Texts a lot and couldn’t decide if we wanted a normal picture or a Memoji. As we said, you can change your Contact Screen later using the methods above, and your Contact Notes are saved so you can switch between them as easily as you would on the Lock Screen in iOS 16.
Use two fingers to drag
If you’re using a traditional portrait, use two fingers to move your face around the door and get it where you want it.